
Start Your 3D Journey in Cinema 4D
Master the essentials of 3D modeling, lighting, and animation in C4D. Enroll in All-Access to unlock C4D Basecamp and 50+ other courses.

Maxon has just launched Cinema 4D R25, and you'll need to see it to believe it!
Cinema 4D is a must-have piece of software for any 3D motion designer. While it it quick to understand, it can take time and patience to master. We've dedicated years to learning the ins and outs of this program, so we're very excited any time Maxon launches a new update. We were expecting the usual optimizations and responses to customer feedback. What we weren't expecting was a serious overhaul.
This is EJ Hassenfratz, 3D Creative Director for School of Motion, and we've got a lot to talk about. Maxon's Cinema 4D update is comprehensive, improves functionality, and brings in some great new features. With changes this radical, some folks might be wondering what just happened to C4D. I don't want you to wait any longer, so let's get into some of these updates!We're going to discuss:
Welcome to Cinema 4D R25
{{lead-magnet}}
Cinema 4D R25 Redesigned UI
The first and most noticeable change is the redesign User Interface. Maxon spent a lot of time thinking about how their app is used, how artists move through the software, and what areas needed a quality of life update. The result is a reorganization of tools, new icons, and overall a ton more flexibility.The ability to move icons from side to side around your viewport allows a new level of customization. You can design the app to work the way you've always wanted, with icons exactly where you want them to be at a moment's notice.
One of my favorite new additions is the Previous Used Tools widget that appears in your HUD. If you're working with a few different tools on a project, you can quickly switch between them without having to dig through icons to find the one you just had in hand. It's a small but vital time saver for your workflow.
The timeline has also received an update, with the colors matching those of the axis. It makes it a lot easier to visually see which dimension track you're affecting. We get it: Change is hard.
This is a bold new UI design and offers many quality of life improvements, but there are some changes—such as burying the "Reset Transform" button in the now hidden Coordinates Manager—that add unnecessary friction. That said, Maxon made it incredibly easy to stay with the R23 style until you're ready to try a few new things. Take the time to get used to the new icons, retrain that brain, and enjoy the future.
Redesigned Icons and Icon Groupings in Cinema 4D R25
As we mentioned before, icons and groupings have changed around for Cinema 4D R25. If you're having trouble finding your favorite tools, switch back to R23 until you're more comfortable with the update UI and can retrain yourself. Once you're ready, you're going to discover some serious quality of life upgrades.
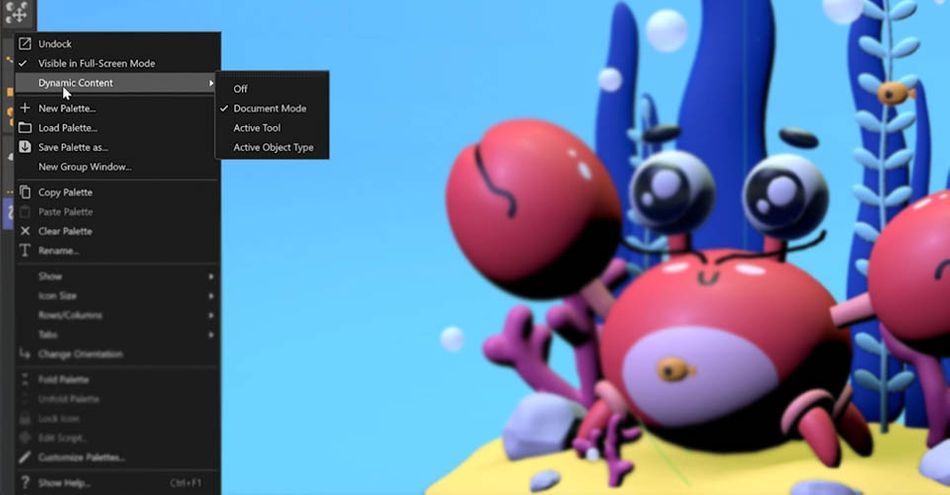
One of my favorites is the Dynamic Content, which adjusts the tools available based on what you're doing. Instead of building out entire presets for specific projects, the software is able to intuit what you're working on and keep a handy list of your tools right at your fingertips. In action, this can sometimes feel like the program is working alongside you, anticipating your needs. If I go to Polygon Mode, all the icons change to keep up, and I never have to lose my momentum.
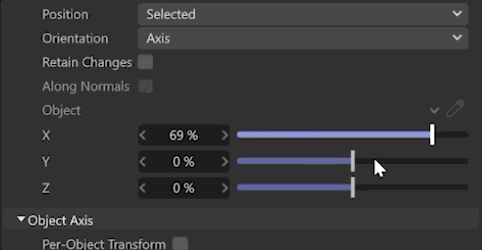
Maxon has also redesigned their sliders to be a bit easier to grab. The functionality is the same, but the tactile feel of grabbing a value and adjusting it makes the process smoother and far more accurate.
Adding and deleting layers is simpler and faster with the updates to the layer window, along with a handy trash can (because who can ever get enough of a trash can?)
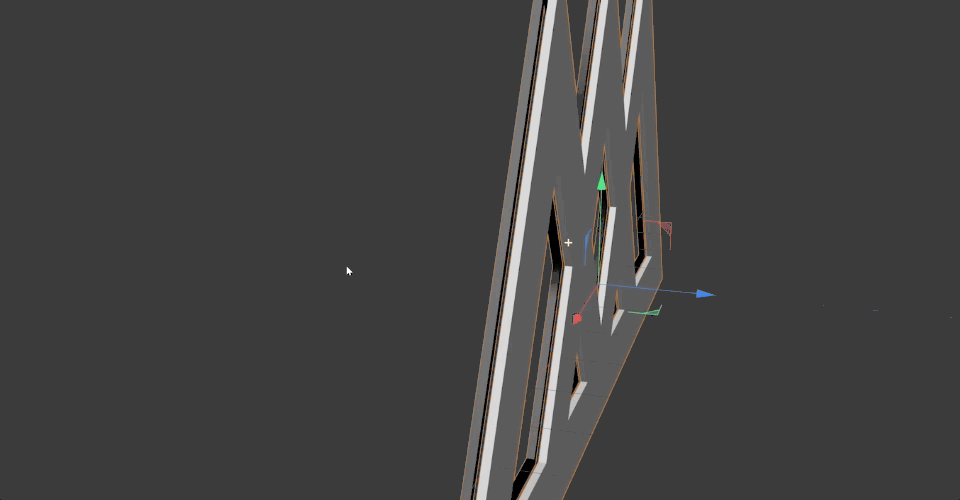
A Larger Viewport in Cinema 4D R25
The most obvious new change—but equally welcome—is the massive Viewport. When you're working in Cinema 4D, it's easy to get lost in your project and lose your spacial awareness. Having a lot more room on your screen to display the workspace is a very welcome change.
Notable New Features in Cinema 4D R25
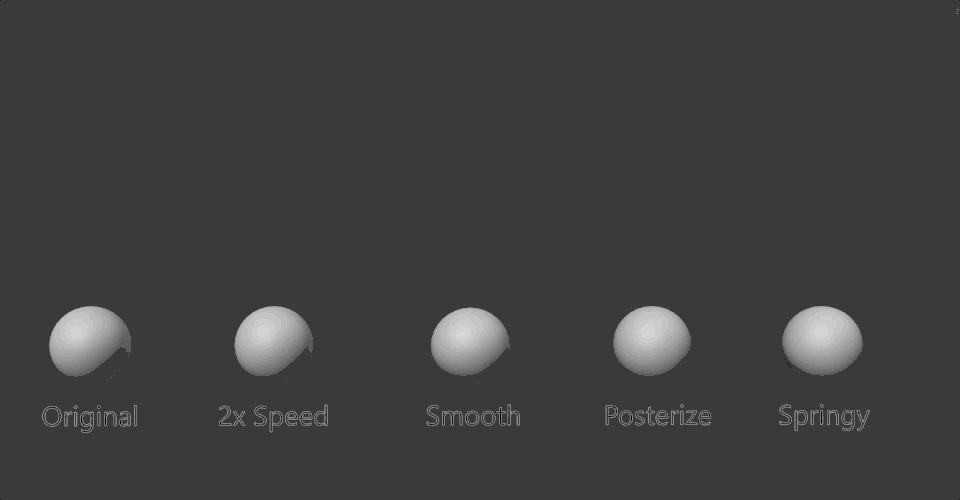
While there are many updates to Scene Nodes and Scene Manager, those are still being revised even as we speak. However, there is one new feature that even a casual C4D user will love: the Track Modifier Tag. If you do a ton of animation, this replaces the old Time Tracks workflow that was pretty cumbersome.
Track Modifier Tag allows you to procedurally re-time animation, and it adds procedural Posterization, Noise, Smooth and Springy properties to animation tracks. There are so many creative things you can do with this Tag, so if you want to see a tutorial about this feature, definitely let us know!
Vector Import (aka the new iteration of CV-Artsmart) makes the process of importing splines super easy. If you work with logos and assets from Illustrator, it makes importing and 3D-ifiying those AI layers a snap.
.gif)
Redshift RT Public Beta—a feature that was first teased back in early 2020—is the real-time engine version of Redshift and is included in R25 as a public beta. Its similar to Blender's Eevee render in that it's close to real-time rendering. Redshift RT will try to match the same results you're getting with Redshift's standard raytrace renderer while allowing you to use the same shaders, lights, and options. You can literally flip a switch to go from raytrace to RT renderer, and the result will be very similar and will be a massive boon to look dev workflows.
We cover everything in a lot more detail in the video above, so be sure to give it a watch! And don't forget to download our free guide to Cinema 4D R25.
Want to learn more? We've got a live stream with Maxon tomorrow!
Can't wait to get into Cinema 4D R25? Same here!
If this announcement has you feeling that—now more than ever—it's important to stay relevant and gain a deeper understanding of how advanced 3D concepts work, we couldn't agree more! We even have a course built to get your skills to that next level: Cinema 4D Ascent!
In Cinema 4D Ascent, you'll learn to master marketable 3D concepts in Cinema 4D from Maxon Certified Trainer, EJ Hassenfratz. Over the course of 12 weeks, this class will teach you the fundamental 3D concepts you need to know to create beautiful renders and tackle any task a studio or client might throw at you.
-----------------------------------------------------------------------------------------------------------------------------------
Tutorial Full Transcript Below 👇:
EJ Hassenfratz (00:00): Max on just released the latest version of Cinema 4d R 25. And I think it's going to be one of the most talked about releases in a very long time. Stay tuned to learn why.
EJ Hassenfratz (00:20): Okay, here we are. My friends are 25 in who lot has changed in a single release, right? We got a darker UI that creates the higher contrast that we got over in Adobe apps. We've got completely, completely redesigned icons all over the place. We've got icon groupings in totally different places and a lot more viewport real estate, which I'm sure a lot of people will appreciate. And the more I spend time here, the more, this kind of looks vaguely familiar to their app. I forget the name. I think I haven't used it cause it's like really expensive or no, I don't. I can't remember. But anyways, I know you're probably saying, you know what the heck man, there was nothing wrong with the old UI. Why change it, man? And I'd say, stop calling me, man, dude. And I know a lot of people don't like new things.
EJ Hassenfratz (01:13): Luckily if you're totally put off by this and this is too much of a shock to your system, there is a handy switch to revert to the old layout. So if you go up to this upper right corner, check off the new layout toggle here and click standard, and you're going to go and revert back to the R 23 layout with all of the icon groupings where you're used to them, albeit you're still going to be dealing with the redesigned icons. Now I feel like it's a lot to switch over to a new app and have icons be number one, completely redesigned and number two, being in completely different places. So I even highly recommend that if you're diving into our 25, use this legacy layout to just get used to the new icon designs and kind of build that muscle memory again. And then once you're used to those new icons, you know, go ahead and switch back over to the actual R twenty-five version because there are a lot of nice quality of life features in our 25 that can make retraining your brain a little bit worth it.
EJ Hassenfratz (02:19): But I would admit it does get a little while to get used to, but this is the future of cinema 4d and there's no better time than now to work on building up that muscle memory here. So let's talk about aside from everything being new and strange and scary, what are some of the cool quality of life updates? Well, you notice we have all these different icon groupings. One of the cool thing is being able to slide these groupings wherever you want. And even at the bottom here, we can slide the icon groupings to say here, if this feels a little bit more comfortable for you, and if you're really not a fan of these tiny icons on the top, you can always go and right click and just go to icon size and just go back to large icons. And this will have the icons the same size as previous versions of cinema 4d, these icons on the top, at least now, as you're getting used to these new icons.
EJ Hassenfratz (03:15): Another thing that might be helpful for you is to right click and go to show and show text and right click again, show, show, text below icon. So now you have these bigger icons, let me actually make them smaller. But now you have these icons that actually have the names of everything attached to them. So again, another handy way to begin to get a hang of these new icons, what are they and just getting your brain used to what's what now this redesign is trying to make things a little bit more efficient for the average cinema 4d user. You can see that all of the objects that you can add to your scene are in this menu, this new menu right here that is right next to your object managers. So there's a lot less pixel distance that your mouse has to travel to start populating your scene with geometry.
EJ Hassenfratz (04:06): Now, one of the cool things is with all of these icons kind of spread out more all across your interface. There are new icons that are docked in your menu. So we go over to the left here, you got your spline tools and added to this side menu is the paint tool. We've got the guide tool and one of my personal favorites, the doodle tool. So you can go in here and you know, let's do a little mustache or something like that, but I like having this doodle tool and some of these other tools just kind of there. And at the ready, you also notice right here, this little widget, and this is actually really cool. This is your previously used tools and Maxon added this nice little widget to your HUD, that you can just quickly go and toggle between all of your previously used tools.
EJ Hassenfratz (04:56): And other cool thing is in some of these menus, you can actually search within them so I can type D O for doodle and it will just filter out the doodle paint tool. You can also do something similarly in the object manager. If I right click on an object, you can see that if I want to get a constraint tag, I can just type in constraint would also help to actually spell it correctly and filter out just those tags that would have a tag in it that contains the letter C O N S. And you can add your constraint tags. So pretty cool that there are these new search options within some of these menus. Another very nice quality of life update is the dynamic menus that are now inside of cinema 4d. So what our dynamic menus you may ask, well, there are menus that adapt to whatever tool or mode that you are in and you can actually right click on this menu and choose what kind of dynamic content you want.
EJ Hassenfratz (05:50): Do you want it to be based on document mode, your active tool, active object types. You have a lot of options there. So what I mean by dynamic menus is if I grab this polygon object and I go to polygon mode, you're going to see all of these icons on the left changed in all of these tools are relevant to polygon modeling here. You got your bevel tool, your extrude, you got your weight subdivision surface, you got welding, you got the line cut tool. You got the iron tool over here. If I switch over to edge mode, you'll see that this also updates for edge specific modeling functions and tools. If I go to point mode, we're going to go and get point specific tools populate this side menu as well. So pretty handy, especially if you're a modeler and you dock these things all the time and it takes up space this way.
EJ Hassenfratz (06:40): You'll have all these icons just appear whenever you need them and should help speed up some of your workflows there. Now you'll notice that in some of these menus as well, we have these new sliders here where you can either scrub a value here or these new redesigned sliders, which are actually really nice and easy to grab. If you ever want to reset anything to default, you can still right click on the arrows to set that back to a default value. If we go over to the layers menu, something that's really cool is the ability to add layers and then also delete them. So in previous versions, if you wanted to delete a layer, you'd have to just select it and delete it. But now we have this little trashcan button, so you can actually delete a layer if you want to, by hitting that button.
EJ Hassenfratz (07:24): Now, if we hop on over to the timeline and see what's new there, you can see there's this timeline icon right there. And one of the cool things is color coded X, Y, and Z tracks. So previously they just be all gray tracks, but now you can see that the tracks match the color of the axis. And if you hit tab to go to F curve mode, you can actually see the text of the X, Y, and Z tracks are color coded as well. So a lot easier to visually see what dimension track your dealing with. Let's go ahead and close that up. Another nice new addition to the default doc icons are right down here in this little timeline menu. One tool that I use a ton is cappuccino and cappuccino is now docked in the timeline here. Basically what cappuccino is, is your after effects, motion trace.
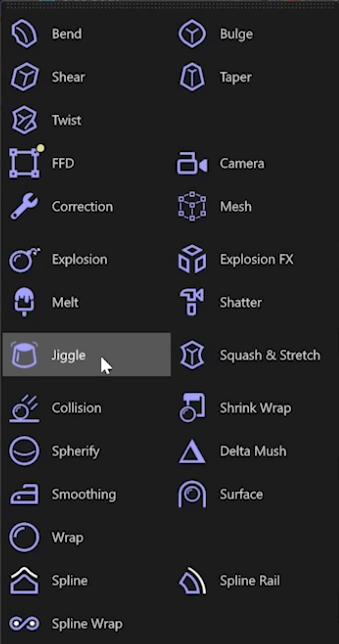
EJ Hassenfratz (08:19): You can move an object around and it will actually convert your mouse animation to keys. So definitely check out cappuccino if you haven't played around with it before another cool thing is these project tabs. So it's almost like a web browser where you can tab over to other project files here, add new ones, close them, right from here. Pretty cool new functionality. As far as toggling between different projects, you don't have to go into a dropdown menu or anything like that. You can just tab over like you're in a browser and I'm going to save the best for last, because my personal favorite is this snazzy new jiggle deformer icon and the melt, these two right here, these new icons, like I want t-shirts of these icons right here. It's my personal favorite there. Now you might be wondering like, where did some of these things move to?
EJ Hassenfratz (09:11): Like everything's kind of reorganized and stuff like that. Like where are the snapping tools they used to be over here? Well, the snapping tools are up here. If you enable snap. There's also the snaps settings, which has a lot of the snap options that are easily accessible. You can check things on or off. They're not buried in a menu that you have to keep opening time and time again. So this is a welcome addition. There, here are your work plane modes. We have access and soft selection. Here are your solo modes, gut viewport, solo hierarchy, and viewport solo, automatic, and then toggling the solo on and off there. Dig the I logo. You might be wondering, okay. We found out that the timeline's hidden down here by clicking that button, but where's the corporate manager and where's the material manager. Well, again, a lot of these things are hidden by default to give you more real estate in your viewport, the materials or hiding in this little icon right here.
EJ Hassenfratz (10:05): If you click that, here are all your icons can choose the style of view. Here. You can increase the size of your icons and all that good stuff here, and you can toggle that material manager on and off by hitting shift F two. And then the coordinate manager is hidden right down here. So shift F seven and there is the coordinate manager. Now, one of my least favorite parts about this UI is that the reset transform AKA, the old reset PSR button is buried in this coordinate manager down here. You can see there is your reset, transform, and I always loved having that reset, transform docked in my menu. In that case, it's very easy to kind of solve that. Just hit shift C to bring up commander, just hit reset, and you'll grab that reset, transform, and then just dock it wherever you want a peer, maybe over here.
EJ Hassenfratz (11:00): And while you just made this a little bit more efficient and as always, if you want to save a layout, if you do a bunch of changes here, you change the icon size, all that good stuff. You want to save this as your default start-up layout. Just go to window customization and go to save as start-up layout or go to save layout as if you just want to save this and toggle to it at some other point in your workflow. But that about covers a lot of the major UI changes over here. We got the new content browser over here that is always updated, which is another cool recent addition to, I believe S 24. So they're always going to be updating here. Now, as far as notable new features, max on did add a lot of updates to save the scene nodes and the scene manager, but to be quite honest, it's still not production ready.
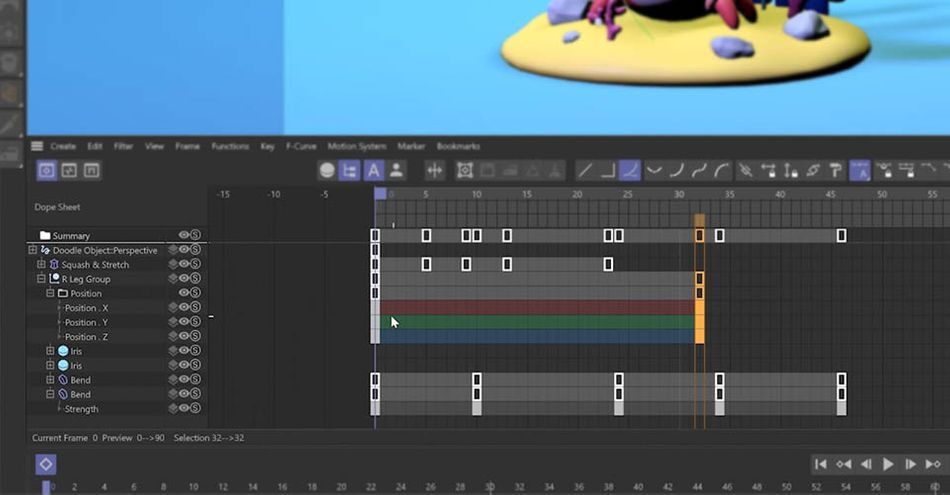
EJ Hassenfratz (11:53): So that leaves our 25 pretty light on updates that impact your average C4 user. The by far, one of the coolest updates in our 25 is called the track modifier tag. So if you do a ton of animation, the track modifier tag is a game changer. This replaces the old time tracks workflow. That was pretty laborious. And we'd use a lot to re-time time animations and stuff like that. This just kind of adds onto it adds so much more functionality. You can see that here is my original animation, just a simple ball bounce and some squash and stretch. And on each of these other spheres, I have a track modifier tag, that's doing different things. So here I have a track modifier tag that is speeding this animation up by two. So doubling the speed here. I have an animation that I actually just changed into linear key frames in this track.
EJ Hassenfratz (12:49): Modifier tag is just smoothing everything out because it's set to smooth mode. And the cool thing about this is you can actually extend the range of the key frames that it's smoothing. And you can almost think of this as a Ghazi and blur radius, like the higher the radius, the more blurred out the image is going to be. It's like with this, the more smooth down the overall animation is going to be. So you can see without this, this is just a very linear animation, just kind of smooth that out really, really nice, smooth as butter. And then this one is a same ball bounce, but we have poster eyes on it and you can change the frame step. And it's almost like you can have an animation that's fully key framed. That's being animated on the ones like here. This is the default. And then you can just hit a couple buttons in your animating on threes or fours.
EJ Hassenfratz (13:42): And this is super, super cool just to post dries your animation like this. And then we have this springy, which is an easy way to just add spring effects, like a delay effect or effect to your existing animation track. So the thing to know about the track modification tag is that it needs an animation track to exist to modify it. Okay. So seems pretty simple, but let me just run you through how this works really quickly. I'm going to right click on this original animation here, go to animation tags, go to track modifier, and you can see we have the default being spring. Okay. But if I go down to post-authorization, you can see that the frame step is set to one, and I can adjust that frame step to get this stepped animation. And you can see that this isn't really taking into account the squash and stretch.
EJ Hassenfratz (14:31): So in the inclusion you can actually say, okay, I also want you to take in the animation tracks of any children objects in this hierarchy. So I'll turn that on. And now you can see that that post-authorization effect is now also applying to that squash and stretch factor animation, which is super cool, can adjust the of the animation as well. Let's reset that back to a frame step once or back to our original animation. Now, if we want it to read time, this animation, we can up this time factor to say 50%, and this is actually going to slow this down by half. Okay. Or by a hundred, like this is slowing this way, way down in to speed it up. We'll just go to a negative time factor. So super cool and procedural way to be able to adjust animation. There's also this noise option too.
EJ Hassenfratz (15:23): So you can add you animated noise to different properties and stuff like that, which is kind of interesting right now it's adding it to my squash and stretch. And in the strength you can actually adjust what you want this track modifier to actually control. Do you want it to add control to the position, the rotation attributes? So the attributes is actually controlling the attributes of that squash and stretch. Another cool thing is if you wanted to say on this original animation here, let's just delete that, modify our tag. If I just wanted to add some track modification to this factor, I could just right. Click on it, go to animation and go to add track modifier tag. And what that's going to do is automatically set in that factor, track into the inclusion. So I can independently adjust or maybe smooth out just that animation track of the squash and stretch and nothing else.
EJ Hassenfratz (16:19): Okay. Which is really, really cool that you can isolate individual tracks or just affect all tracks altogether by using that hierarchy options. So super cool. And this is just kind of scratching the surface. I'm just going to show you a quick animation here and you know, how, you know, spider verse, we got animation on the ones, the twos, the fours, and you know, it just really helps sell the storytelling and adds texture to animation this track modifier tag. I can't wait to see more texture in animation for sure, because here I have this original animation here. And then with that original, smooth doubt animation at 30 frames per second, if I just hit play here, I can use track modifier tags to animate on the twos or the fours. And you can see here on this track, modifier tag, the frame step is every four frames.
EJ Hassenfratz (17:14): Okay. On the twos, we got the frame step, every two frames. And then on the twos and fours, I actually have here, hold key frames on the frame step. So I'm changing this from a frame step of two to four, and then back to two, back to four, and then back to two. So I'm adding texture to my animation by using the underlying original animation that you can see here. And then just key framing this frame step, which is super cool. And I can't wait to play around with this a lot more so you can see there's so many creative things you can do with this tag. So if you want to see a tutorial about this feature and how to animate with it, definitely let us know in the comments. Now, if you use a lot of paths and import a lot of paths and logos from illustrator, this next new feature is going to be huge for you.
EJ Hassenfratz (18:09): It is called the vector import tool and it's in our generators menu here. And basically what it allows you to do is open up in illustrator file. So let's open this up here. And if I go over into illustrator to show you what this original illustrator file is, it's basically what this is, is just a fill with a stroke and what the vector import does, and not only imports your paths and extrudes them, but it also imports your strokes as well. If you don't need to do that, create outlines on your stroke, it just imports automatically. And you have all of these different types of options, path spread, extrude depth. You can, you can just the extruded depth pretty easily here. And then you have individual sweep options for that stroke that we brought over from illustrator. So we can change the depth, go to negative depth here.
EJ Hassenfratz (19:08): We can add some rounding to really round that out really nicely like, so there is a growth you can actually animate the growth of that stroke on, and then you can actually offset this and maybe get a little something like that. So, pretty cool. You can also go and check on this hierarchy. You actually see all the things that were created. So we get this sweep object in this extrude object. So if we want to make this editable, this is what we'll ultimately get. So this is just a much easier way to work with paths from illustrator. Now, one last new notable feature in our twenty-five is the inclusion of the public beta version of red shift RT. Now Redshift R T is a feature that was actually first teased back in early 2020, it's the real-time engine version of Redshift. And it's very similar to blender's Eevee render, where it's pretty close to real-time rendering.
EJ Hassenfratz (20:09): So Redshift R T you can literally turn on with a switch and it's going to pretty much try to match the same results you're getting with Redshift standard. Ray trace render well, allowing you to use the same shaders lights and other options. Unfortunately, it's only available for users with a direct X capable system. So what do you think of this new look, cinema 4d? What do you like? What don't you like? I mean, this is the biggest change in look and feel since then 4d was created. So I'd be really interested to hear what you think. So be sure to leave those thoughts that you have in the comment section below me personally, it took a little bit of time to get used to feeling even the most remote comfortable in our 25, maybe two weeks of using it full time to get the hang of it.
EJ Hassenfratz (20:57): And you do start to see how the quality of life improvements affect your day to day, but then you kind of see how other things kind of affect your day-to-day like things like having that reset, transformed button, being buried in the coordinates manager and some other things that you would have to get used to, but it is going to be interesting cause we're getting a little peek into the future of not only cinema 4d with C nodes in the scene manager, but Redshift with Redshift R T. So it's going to be very interesting to pay attention, to see beyond these first steps where cinema 4d goes. So if you want to keep up to date with all the latest news in cinema 4d land and the MoGraph world in general, be sure to like this video and be sure to ding that bell. So you'll get notified of all of our latest videos at school of motion. Now, if you'll excuse me, I got to go pick up my juggle to former t-shirts. So I will see you in the next video. Bye everybody.
ENROLL NOW!
Acidbite ➔
50% off everything

ActionVFX ➔
30% off all plans and credit packs - starts 11/26

Adobe ➔
50% off all apps and plans through 11/29

aescripts ➔
25% off everything through 12/6
Affinity ➔
50% off all products

Battleaxe ➔
30% off from 11/29-12/7
Boom Library ➔
30% off Boom One, their 48,000+ file audio library
BorisFX ➔
25% off everything, 11/25-12/1

Cavalry ➔
33% off pro subscriptions (11/29 - 12/4)

FXFactory ➔
25% off with code BLACKFRIDAY until 12/3

Goodboyninja ➔
20% off everything

Happy Editing ➔
50% off with code BLACKFRIDAY

Huion ➔
Up to 50% off affordable, high-quality pen display tablets

Insydium ➔
50% off through 12/4
JangaFX ➔
30% off an indie annual license
Kitbash 3D ➔
$200 off Cargo Pro, their entire library
Knights of the Editing Table ➔
Up to 20% off Premiere Pro Extensions
Maxon ➔
25% off Maxon One, ZBrush, & Redshift - Annual Subscriptions (11/29 - 12/8)
Mode Designs ➔
Deals on premium keyboards and accessories
Motion Array ➔
10% off the Everything plan
Motion Hatch ➔
Perfect Your Pricing Toolkit - 50% off (11/29 - 12/2)

MotionVFX ➔
30% off Design/CineStudio, and PPro Resolve packs with code: BW30

Rocket Lasso ➔
50% off all plug-ins (11/29 - 12/2)

Rokoko ➔
45% off the indie creator bundle with code: RKK_SchoolOfMotion (revenue must be under $100K a year)

Shapefest ➔
80% off a Shapefest Pro annual subscription for life (11/29 - 12/2)

The Pixel Lab ➔
30% off everything
Toolfarm ➔
Various plugins and tools on sale

True Grit Texture ➔
50-70% off (starts Wednesday, runs for about a week)

Vincent Schwenk ➔
50% discount with code RENDERSALE

Wacom ➔
Up to $120 off new tablets + deals on refurbished items


Start Your 3D Journey in Cinema 4D
Master the essentials of 3D modeling, lighting, and animation in C4D. Enroll in All-Access to unlock C4D Basecamp and 50+ other courses.