
All-Access Pass
Unlimited access to 50+ courses, unlimited critique, live events, and 24/7 community. Join School of Motion All-Access today.

We gathered 3 of the most common problems Mixamo users come across and answer them.
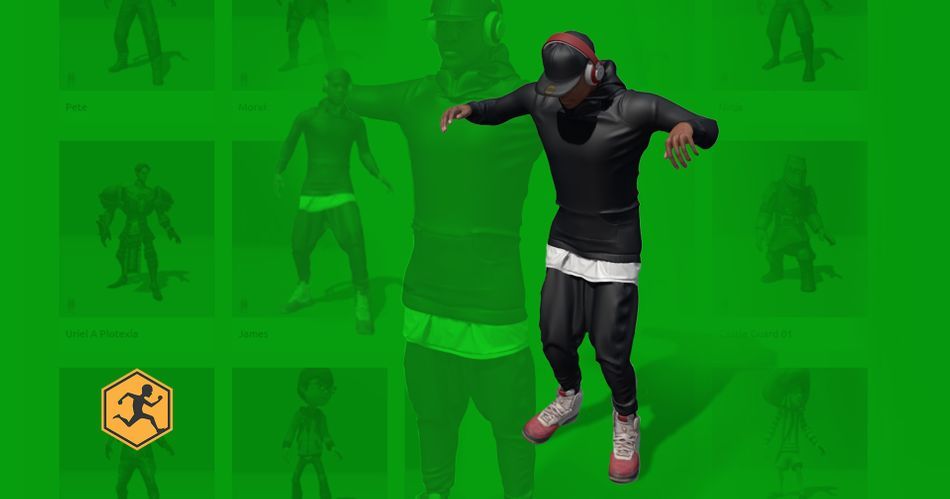
Mixamo is a super fun tool to use for 3D rigging, animating, and modeling. Designed for beginners, the program is intuitive and flexible...or at least it can be. A lot of new users struggle at first, and that can lead to "giving-up-itis." That's why I put together a quick list of tips to get you started.
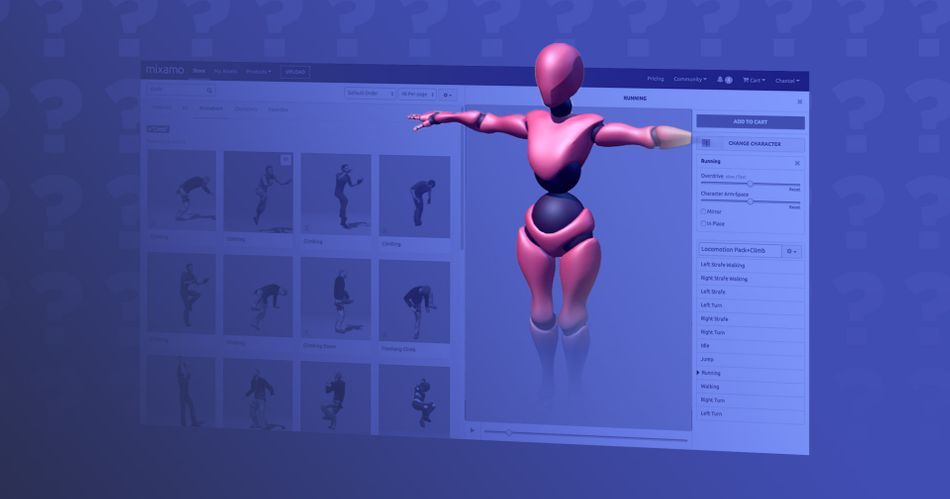
In the beginning, you will come across multiple hurdles that can either be resolved right inside of Mixamo, or straight after in the 3D package of your choice. For this article, we will use Cinema 4D. If you’ve picked up Mixamo and gave up due to hurdles, then it’s time to give it one more try.
In this article, we'll focus on 3 common questions:
- What to do if textures disappear when importing Mixamo models
- How to blend multiple Mixamo mocap animations together
- How to get the Mixamo Control Rig to work with my Mixamo character
My textures are disappearing when importing Mixamo models
Textures importing successfully into Mixamo can depend on a number of factors, such as what package you are importing from and how you ready your files in that package. Let's go over these in finer details.
MIXAMO AND ADOBE FUSE CREATED CHARACTERS
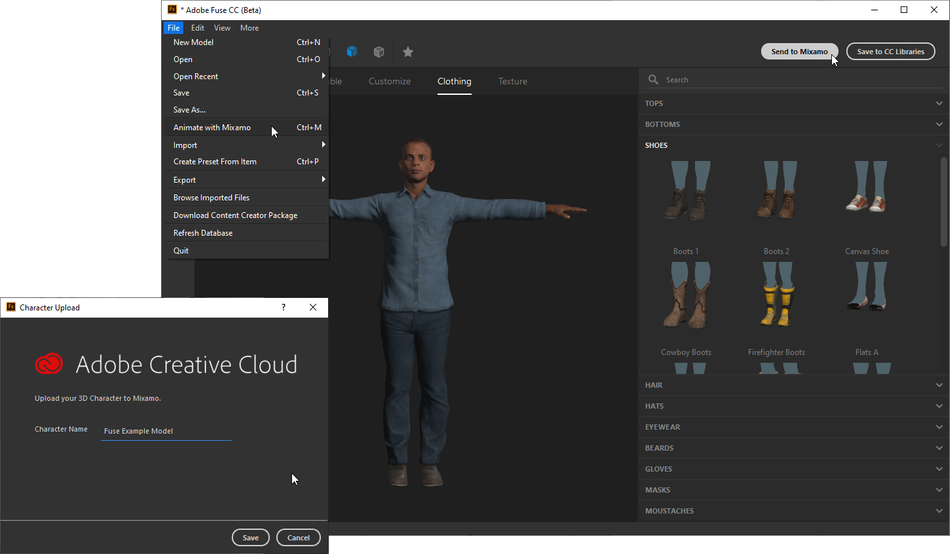
If you choose the characters from the Mixamo library—or create characters with Adobe Fuse and upload them directly from Fuse to Mixamo—the UV textures should be easily retained by Mixamo. When downloading your character, click Download and choose .FBX format.
Open Cinema 4D, and in the Objects viewport click File/Merge Objects (ctrl/command +shift+O) then select the .FBX. You can also minimize your Cinema 4D window and drag and drop the .FBX onto your viewport to import. An import setting panel will popup. Be sure to have materials set to standard and Substances checked. The character should import, and Cinema 4D will create a textures folder with the UV textures.
BAKING MODELS
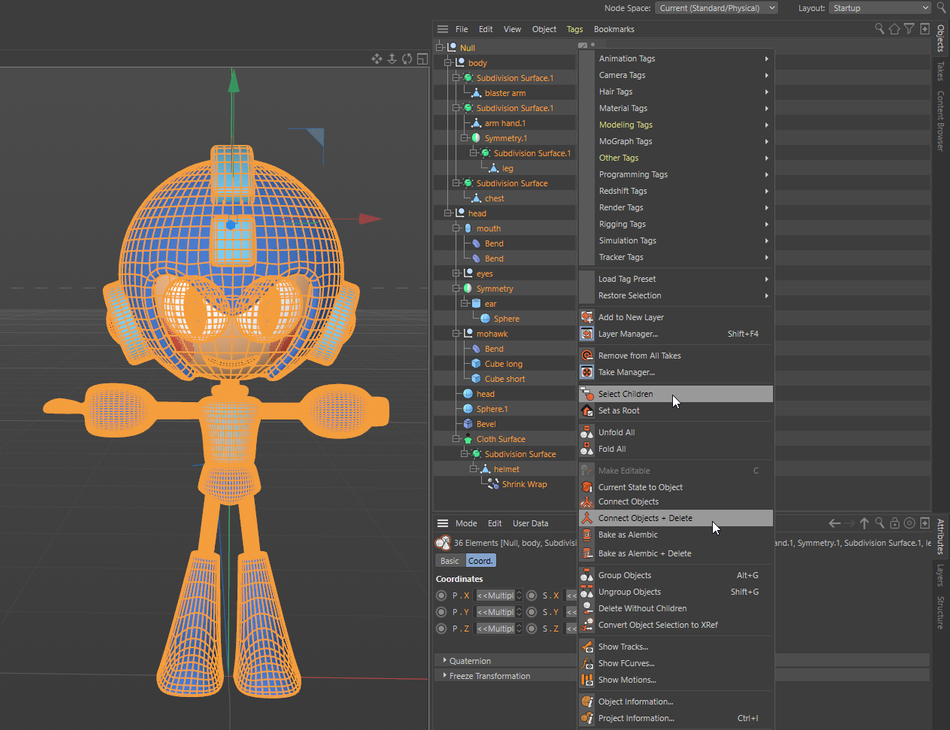
Remove all staging, lights, cameras, etc. Only your character should remain. Also, make sure your character is pointing toward positive + in the Z axis. If your character is made of multiple objects—nested in subdivision surfaces, symmetry objects, and sweep nurbs—you need to bake it down. But first, you need to make sure that they have enough subdivisions so the characters can bend correctly. To bake them down, select all the object layers, right click, and select Connect Objects + Delete.
BAKING TEXTURES
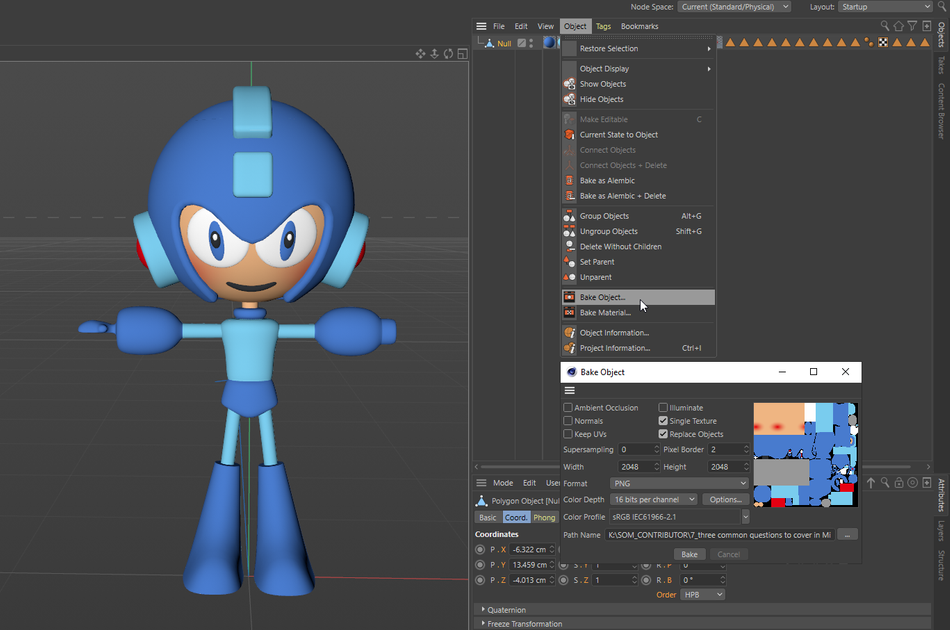
When exporting a model in Mixamo, you may have noticed the colors sometimes don’t transfer over. The problem is basic color channels don’t translate, but image textures (UV-mapped textures) do. So the solution is to either bake your colors, or manually add them back one by one in Cinema 4D.
To bake the colors there are two methods you can try:
Method 1:

- Select the object and go to Tags/Material Tags/Bake Material.
- Under Bake Material, add the name of your texture in the Filename field and choose with the (…) button where you want that texture to be saved. We can leave the Format set to JPEG.
- Set the resolution Width & Height somewhere around 1024x1024 to 2048x2048 (depends on resolution you require and how close your camera is zoomed in on your character)
- Supersampling set to 0 (if you're using shadow, you may want to increase this number)
- Pixel Border set to 1 (adds 1px padding on your UV to avoid seams in your mesh. If you do see seams in your final render, increase to 2px)
- Since we baked down our model, we have a bunch of selection tags and multiple texture tags. So under the Options tab, be sure to tick Use Polygon Selection.
- If you have bump channels, luminance channels, etc, be sure to also have these channels' checkboxes ticked.
- If normal and bump maps are ticked, be sure to also tick the Evaluate Bump checkbox.
- Set Optical Mapping to Cubic.
- Finally click Bake. Now all that is left to do is create a New Default Material. Open up the material editor and apply the baked texture onto all the channels you baked out. Be sure the material is set to Projection/UVW Mapping.
Method 2:

- Click the character object
- Go to Objects/Bake Objects
- A Bake Objects Panel will open
- Tick the checkbox Single Texture
- Tick the checkbox Replace Objects (that way it deletes the non baked version with the baked object.
- Format png/jpg (apparently png is more recognised across multiple platforms)
- Set the resolution Width & Height somewhere around 1024x1024 to 2048x2048
- Choose a Path Name to where your png/jpg will be saved. The image will be saved the same as your object character name, so name accordingly.
- Make sure the character object is selected and click Bake.
- The baked version may appear blurry in the viewport. That’s okay; it renders out fine.

If you want it sharper in the viewport, just double-click the material to open the Material Editor and click Viewport. Change the default Texture Preview size to No Scaling.
- Delete selection tags (triangles)
- Under materials Edit/Delete Unused Materials.
HOW TO EXPORT CHARACTERS USING TEXTURE-BASED MATERIALS
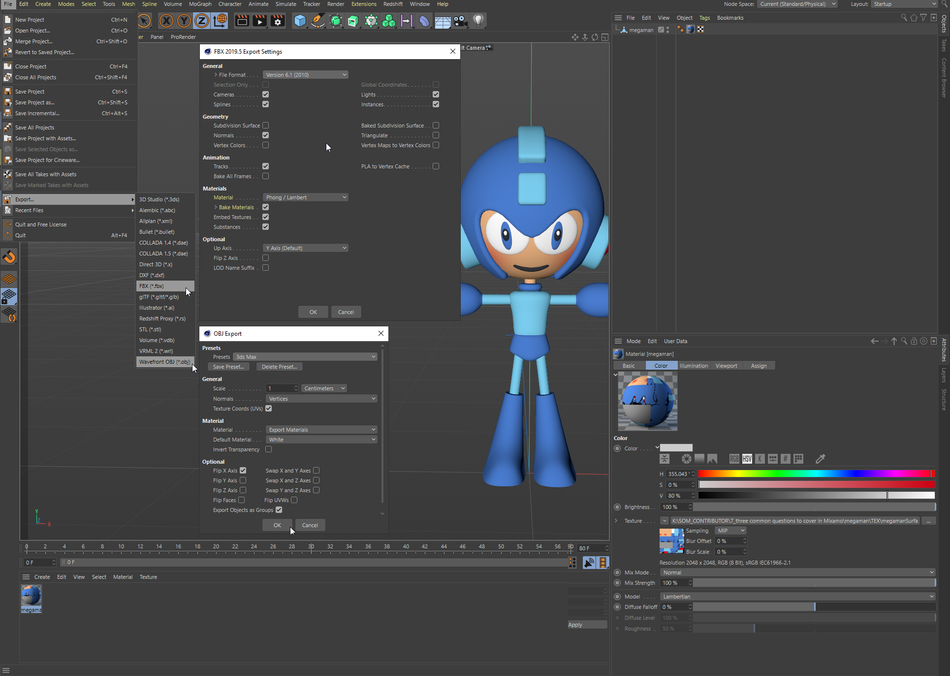
- Export your character by going to File/Export and choose the format .FBX. An .OBJ will work, but without the skin material you just baked.
- If you select .FBX, an FBX options panel will appear. Check the boxes under the Additional header: Textures and Materials, Embed Textures, and Substances.
- FBX default version is set to 7.7 (2019). Set it to version 6.1 (2010). Higher versions won’t bring your textures across successfully.

Tips:
Make sure your character's position is set to X - 0, Y - 0, Z - 0 before exporting out to FBX for Mixamo. Even though the Megaman character I modeled was centered perfectly, he wasn’t 100% symmetrical. The blaster (MGM Mega-Buster, if we're being technical) on his left arm was smaller than his right hand. In Mixamo’s auto rigger panel, the symmetry line is not centered, but a bit off to the left. Uncheck the Used Symmetry checkbox and now move the makers.
When modeling your character’s feet, be sure to model the feet pointing forward, not sideways. Unless of course you want your character walking like Charlie Chaplin.
IMPORTING THE MIXAMO RIGGED CHARACTER FBX BACK INTO C4D
Sometimes the textures of a Mixamo Rigged Character are a hot mess once imported back into C4D. If so, delete the textures and create new ones by going to the Create/New Default Material. Iin the Material Editor, go to Color/Texture/… and choose the original texture .PNG you baked before exporting to Mixamo.
Don’t forget, if the texture still looks fuzzy in the viewport, double-click in the material's Material Editor/Viewport and change the Texture Preview Size from Default to No Scaling.
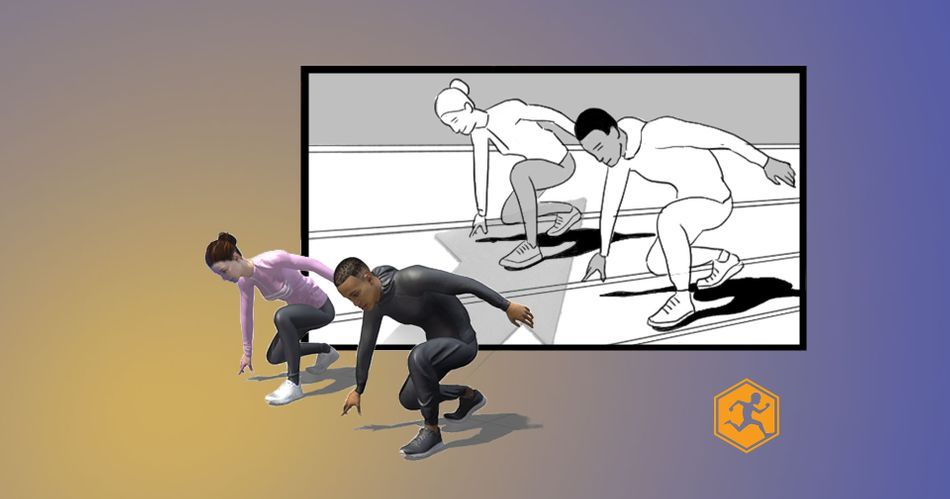
How to Blend Multiple Mixamo Mocap Animations Together
For those new to Mixamo, you can’t blend multiple animations inside the program. You can only export one animation at a time and frame blend them in a 3D package. We will cover how you do this inside of Cinema 4D.
- First, import your character. File/Merge and locate your Running.fbx
- Click OK on the FBX import setting panel
- Click mixamorig:Hips in your objects panel. It's the layer with the green joint symbol
- Click Animate/Add Motion Clip and label it after the action (ie Running) and then click OK. This will bake your keyframes into a Motion Clip.
- Press Shift+F3 to open your Timeline (Dope Sheet)
- Click View/Motion Mode
- On the left there will be a library with a single baked animation labeled Running. It's already also on your timeline. If you can't see anything on your timeline press View/Automatic Mode (Alt+A)
- By baking the animation to a Motion Clip, you have unlocked a whole new set of options for editing your animation. Now in the motion clip's attribute panel, you will have the option to add loops to your animation—and even decide where to start and end your animation without even touching a keyframe!
- If you intend to load in more than one animation, you will need to first save your running bake by right-clicking running in your left panel (before the motion mode panel) and choosing Save Motion Source As... Be sure to create a MotionSource folder to save it into. It will save out as running.c4dsrc
- Select all your layers in the object menu and group them in a null (ALT+G) and label it character.
- Repeat and load in the other FBX files individually, baking the animation as before and saving out your other animations to want to blend with running. Ie. Running.c4dsrc, Flipping.c4dsrc & Stopping.c4dsrc etc. Each time you import .fbx files in, it will load in the full character. Once you have exported out all your .c4dsrc files you can delete all the extra character layers. You only need the original rig in the null labeled character.
- Import the .c4dsrc files back into your timeline by right clicking over the name of the animation in the far left panel before the motion mode panel and clicking Load Motion Source...

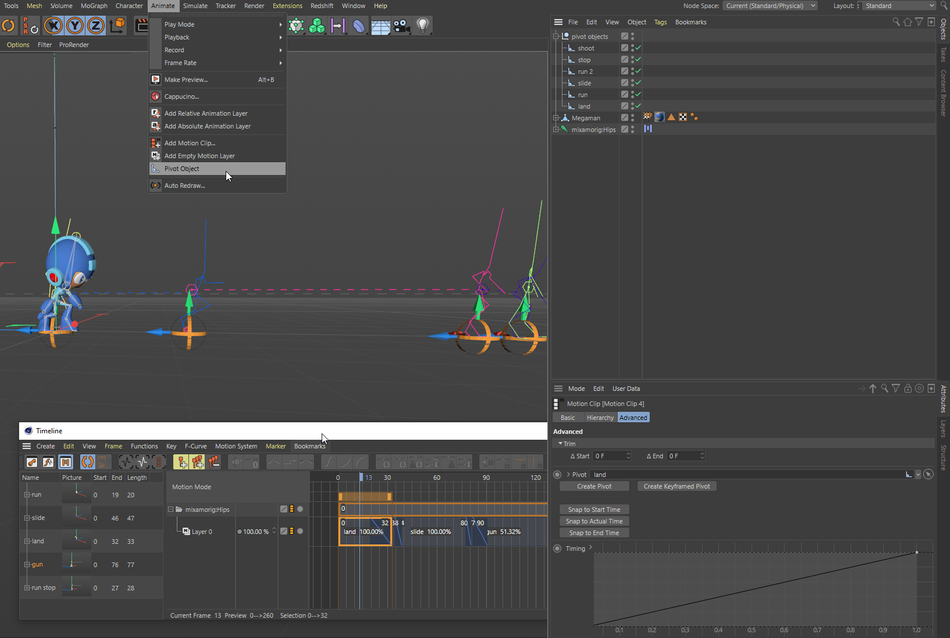
Large Side Note
I have been unable to add a Mixamo Control Rig to Mixamo animation that has multiple Motion Clips with frame blending already on. For the best results, first create and add the Mixamo Control Rig, and only after add the extra Motion Clips and create/parent Pivot Objects. I emailed this issue to the Maxon support team, and they have tested and noted that this is a problem. It has been forwarded to the developer team, so we'll hopefully have a new fix in the future.
There is a fast and dirty workaround if you have already spent ages creating and editing Motion Clips however. Select all the Motion Clips on the Motion Mode timeline. Go to Motion System/Convert Layer to Keyframe Animation and it will bake your keyframes. Then just delete unnecessary Pivot Objects and the Motion System Expression tag on your Character joint (green). Now add the Mixamo Control Rig.

Now you have all the baked animations, just drag them onto the timeline in the order you would like them to animate in.
- Drag one animation over the top of another animation, and you will notice it blends the ending of the 1st animation into the beginning of the 2nd animation. You can change blending interpolation to linear on the Attributes panel under Basic on the Blending dropdown menu. Change from Easy Ease to Linear
- To move each animation individually into position you need to create Pivot Objects and parent it to the animations.
- Press Animate/Pivot Object. Label it Running. Select the running motion clip on your timeline. Group (Alt+G) all pivot objects in a folder named Pivot Objects.
- Parent each animation individually to it’s pivot object by right clicking on the animation motion mode timeline. To the right the Motion Clip will have an Attributes panel. Go to the Advanced tab and you will see an empty Pivot field. Drag the Pivot Null from your objects panel directly into this field.
- Drag the Pivot objects to move animations. That way when your character goes from running into a flip, his flip starts at the end of the run rather than the beginning. The closer the start and end points are, the less sliding. Basically line up the stickman with the other stickman by dragging the orange balls.

If your character is sliding between blends, the two issues are solved by:
- Setting the interpolation to spline or linear
- Creating Pivot Objects and correctly placing them close as possible to the start of the next animation.
How to Get the Mixamo Control Rig to Work with the Mixamo Character
There are 3 issues that may arise when using Mixamo with Cinema 4D’s Mixamo Control Rig (in C4D R21 and upwards.)
TAKE SYSTEM

When importing Mixamo rigs into Cinema 4D, it sometimes comes in as a take layer. If so, here’s what you need to do. Go to your Takes tab and you will see the animation is recorded as a take labeled Mixamo.com. The problem with this is that you can’t then manually keyframe anything, because all your coordinates are grayed out on the Attributes tab.
To fix this problem you need to make sure the box on the left of Mixamo.com is highlighted white. Then go to File/Current Take to New Document. This will create a totally new C4D file with only the Mixamo.com take, and now all the attributes have been unlocked.
RESETTING TO A T-POSE IN CINEMA 4D
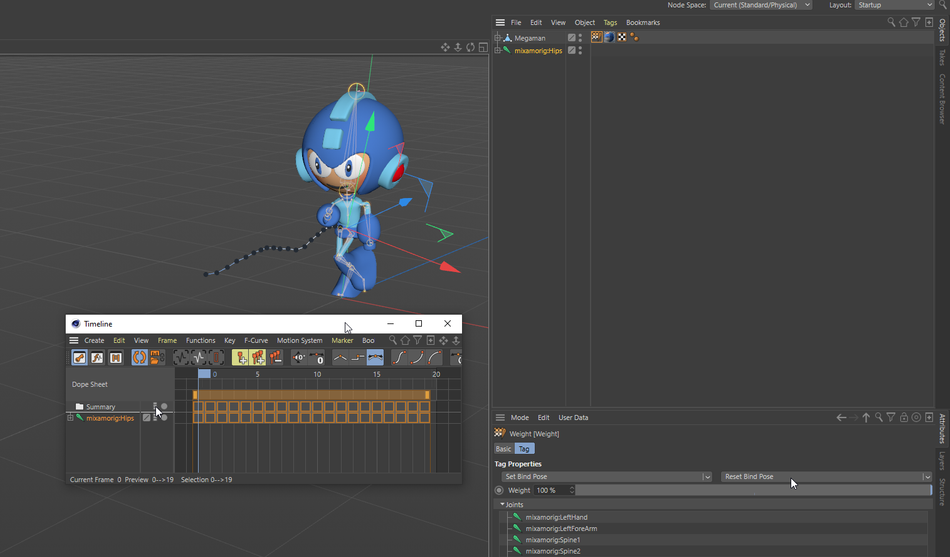
Before you add a Mixamo character rig, you will first need to disable the animation and reset the character's bind pose.
Simply press Shift+F3 to open up your animation timeline. Click on the yellow Motion Clip icon on the dope sheet (it looks like a film strip). The icons will turn off from yellow to gray. The animation is now deactivated. Reset the character to a T-pose by shift-selecting to select all the Weight Expression tags in the Objects menu and in the Attributes panel and press Reset Bind Pose. Once the rig is applied, you simply need to click the motion clip icon in the animation dope sheet back to yellow to turn the animation back on.
SETTING UP THE RIG CORRECTLY
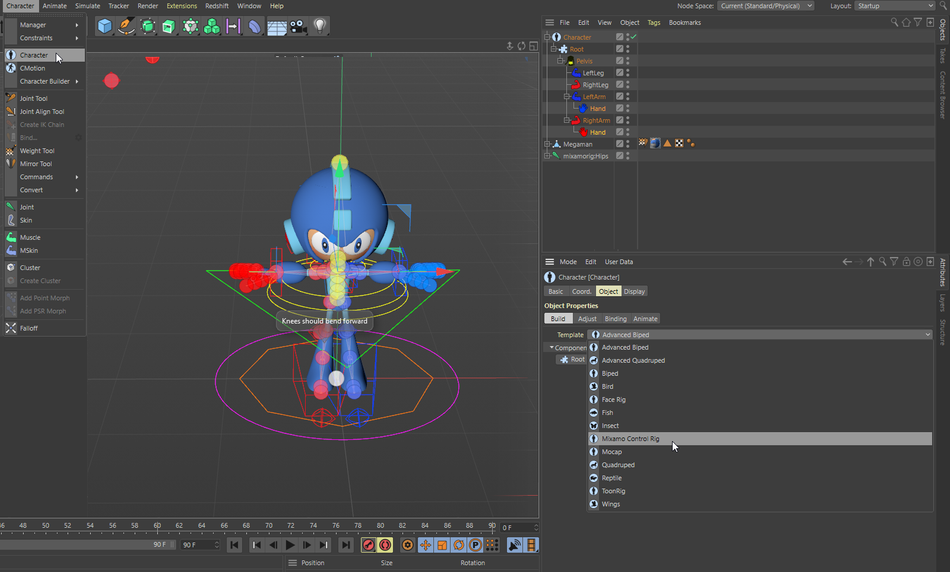
After sorting out your Take System and resetting your character’s T-pose, you are now ready to set up the character’s rig.
On your character menu, click the character object and the character will appear in your objects manager. Once selected, go to the object tab/build tab and on the dropdown select Mixamo Control Rig.
Under the components tab:
- click Root
- click Pelvis Mixamo
- arm & leg Mixamo tabs will appear.
- hold Command/Ctrl key to get both legs to be added
- click the Pelvis object again
- hold Command/Ctrl key to get both arms to be added
- then click Hand to get hands added to the arms.

The next step is to snap the rig you have just created to your joints.Simply click on the Adjust tab and the rig will snap to the rig. If it doesn’t, assume the brace position and hum until it fixes itself. I’m only kidding. Chances are, the issue is the way Mixamo has labeled your joints. Each character in Mixamo has different naming conventions. There is an easy fix. We need to use Naming Tool.
If you look at the joint (green diamond), it should be labeled mixamorig:Hips.If not, perhaps it’s labeled Hips or mixamorig:Hips_3. The mistake is it either doesn’t have mixamorig at the beginning, or it should have the _3 removed at the end.
To fix this, right-click the joint and click Select Children. It will select all joints in the hierarchy.
Next, go to Tools and search for the Naming Tool.
To add mixamorig: to the front of the naming convention type mixamorig: in the Replace/Prefix field and click Replace Name.
To remove _3 at the end, type _3 in the Replace/Replace box, uncheck Match Case and click Replace Name.
Now return to your Adjust tab and the rig should snap to your character.
The next thing we need to do is adjust the knee joints as they are currently bending in the wrong direction. In recent C4D updates, there is now an annotation on the viewport with a note that knees should bend forward. Change your camera angle to right/left side view. Make sure you are still in the Character/Object/ Adjust tab. Use your live selection tool (9) with Only Select Visible Elements checkbox unchecked on the Attributes/Options tab. Select the knee joints and drag holding forward holding down 7 key to only move the knee joints in the rig.

Next click on the Animate tab and click RetargetAll.
Next to go to the Weight Transfer tab. Drag the body mesh into the WeighTags field. Note - Be sure to temporarily turn the lock icon on the Attributes Panel. That way you can shift and select all the meshes in one go without the panel switching. Now that the rig is applied you simply need to click the motion clip icon in the animation dope sheet back to yellow to turn the animation back on. Now you are able to make manual edits to the animation.
ADDING CHARACTER TO YOUR ANIMATIONS WITH MIXAMO AND C4D
MIXAMO CHARACTER ANIMATION IN CINEMA 4D: ENHANCED WITH R21
Learn more about how to use Mixamo
If you want to learn more about Mixamo be sure to check out these articles:
4 WAY MIXAMO MAKES ANIMATION EASIER
HOW TO USE MIXAMO FOR ILLUSTRATING STORYBOARDS
RIG AND ANIMATE 3D CHARACTERS WITH MIXAMO IN C4D

DIY MOTION CAPTURE FOR 3D CHARACTER ANIMATION

Some cool 3D courses and resources
For those who came to Mixamo because your C4D animation, modeling, and rigging was lacking, here are some resources to get you started in the world of Cinema 4D.
Modelling in C4D: Ultimate Guide To Stylized 3D ModelingCharacter Modelling and rigging in C4D: 3D Character Modeling & Rigging
Advanced Modeling in C4D - MILG11: Hard Surface Modelling Tactics For Cinema 4D
ENROLL NOW!
Acidbite ➔
50% off everything

ActionVFX ➔
30% off all plans and credit packs - starts 11/26

Adobe ➔
50% off all apps and plans through 11/29

aescripts ➔
25% off everything through 12/6
Affinity ➔
50% off all products

Battleaxe ➔
30% off from 11/29-12/7
Boom Library ➔
30% off Boom One, their 48,000+ file audio library
BorisFX ➔
25% off everything, 11/25-12/1

Cavalry ➔
33% off pro subscriptions (11/29 - 12/4)

FXFactory ➔
25% off with code BLACKFRIDAY until 12/3

Goodboyninja ➔
20% off everything

Happy Editing ➔
50% off with code BLACKFRIDAY

Huion ➔
Up to 50% off affordable, high-quality pen display tablets

Insydium ➔
50% off through 12/4
JangaFX ➔
30% off an indie annual license
Kitbash 3D ➔
$200 off Cargo Pro, their entire library
Knights of the Editing Table ➔
Up to 20% off Premiere Pro Extensions
Maxon ➔
25% off Maxon One, ZBrush, & Redshift - Annual Subscriptions (11/29 - 12/8)
Mode Designs ➔
Deals on premium keyboards and accessories
Motion Array ➔
10% off the Everything plan
Motion Hatch ➔
Perfect Your Pricing Toolkit - 50% off (11/29 - 12/2)

MotionVFX ➔
30% off Design/CineStudio, and PPro Resolve packs with code: BW30

Rocket Lasso ➔
50% off all plug-ins (11/29 - 12/2)

Rokoko ➔
45% off the indie creator bundle with code: RKK_SchoolOfMotion (revenue must be under $100K a year)

Shapefest ➔
80% off a Shapefest Pro annual subscription for life (11/29 - 12/2)

The Pixel Lab ➔
30% off everything
Toolfarm ➔
Various plugins and tools on sale

True Grit Texture ➔
50-70% off (starts Wednesday, runs for about a week)

Vincent Schwenk ➔
50% discount with code RENDERSALE

Wacom ➔
Up to $120 off new tablets + deals on refurbished items


All-Access Pass
Unlimited access to 50+ courses, unlimited critique, live events, and 24/7 community. Join School of Motion All-Access today.